Setup a WooCommerce Staging Environment
You need to test every single update in a safe sandboxed environment away from your live store.
We typically refer to this as a staging version of your website. A staging environment shouldn’t be considered a disposable test environment. Far from it. It should be considered a “dress rehearsal” version of your website with identical data, identical plugins and so on. If your staging environment no longer aligns closely with your live website its value as a safe place to test changes before we make them on our live website is lost. In that scenario, a staging version can no longer be a reliable indicator of what will happen to our live website when we run plugin updates.
You could set up a staging site locally, using for example the excellent DevKinsta, or you could set it up on a live server.
Here’s how I typically setup a WooCommerce staging website:
Create a staging subdomain
If your main store is www.mycoolstore.com you should setup a subdomain staging.mycoolstore.com. Some people will tell you to setup www.mycoolstore.com/staging. Don’t do that. Why? Quite often that means the staging copy of your store ends up being a directory inside your live store. That can be a major problem for lots of reasons:
- If something goes wrong on your staging version it can blow up your live version.
- If your website has a ton of image/video assets you’ve just doubled the size of your live version which can be a big problem for things like backup plugins
If you’re using a common hosting control panel like cPanel it’s pretty straightforward to create a subdomain.
First, login to your cPanel and find the Subdomains option. If you don’t see this talk to your hosting company.

Next, enter staging as the Subdomain name.
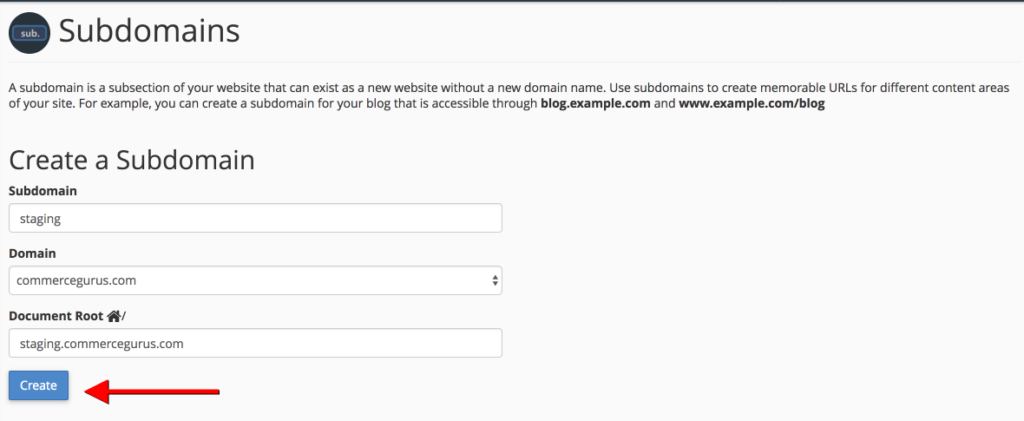
Click the Create button which will create your subdomain.
Copy your live store to staging
There a ton of different ways to copy your live store to your staging subdomain. Here are some of the most common:
Method 1: Use a plugin like WP Staging – I recommend you avoid using this plugin. In short, it creates the staging version of your website inside your live website. I’m completely opposed to that approach for the reasons mentioned earlier. You need to keep your live and staging versions 100% separate – no exceptions. A good alternative to WP Staging is the Duplicator plugin. While it can struggle with larger WooCommerce websites it generally works very well for smaller stores.
Method 2: Do it manually – this is most reliable way to do it – although it’s generally the hardest/slowest. If you’re site isn’t that big, you can easily zip your entire site via cPanel as follows:
NOTE: Make sure you have a backup of your live site before going further!
1.) Copy your WP files by doing to cPanel -> File Manager

Find the root your live website. If you’ve just got one website this will usually by /home/mycoolstore/www or /home/mycoolstore/public_html
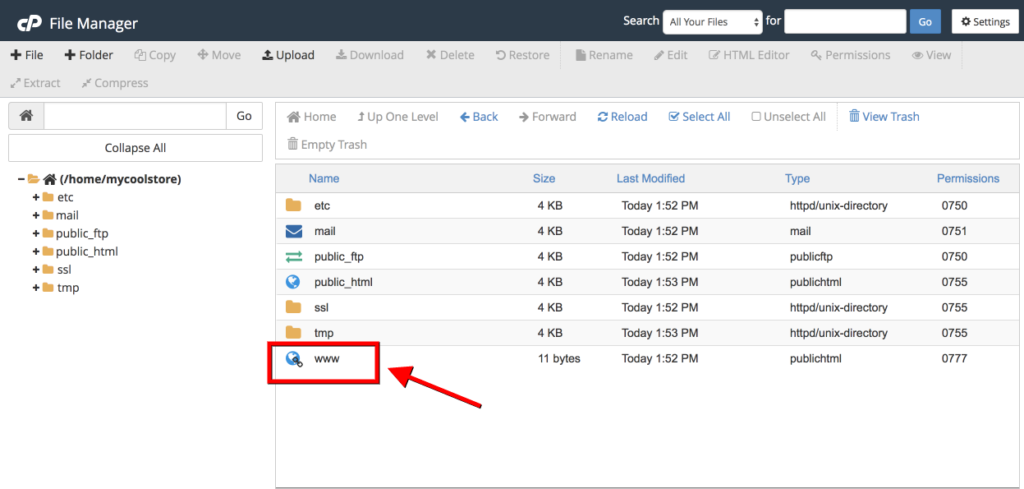
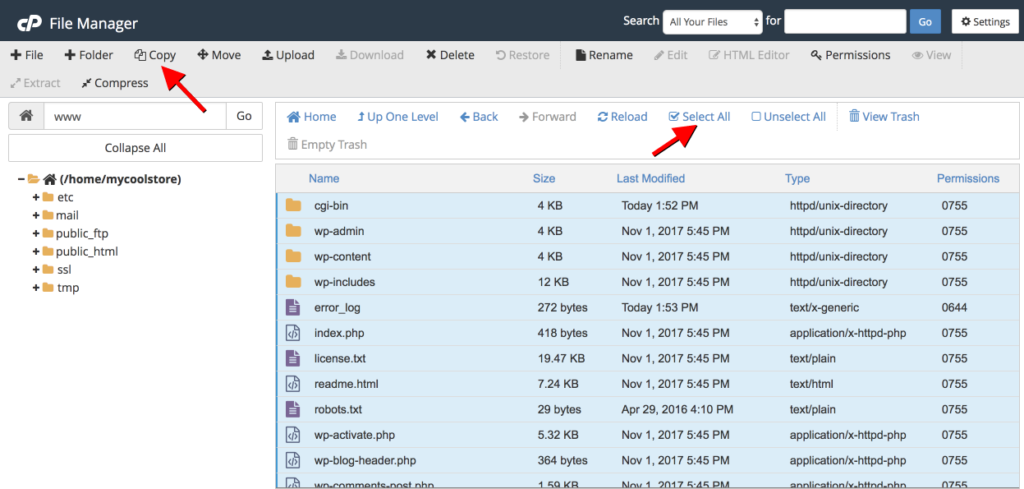
Next, select all inside your main web root and click Copy
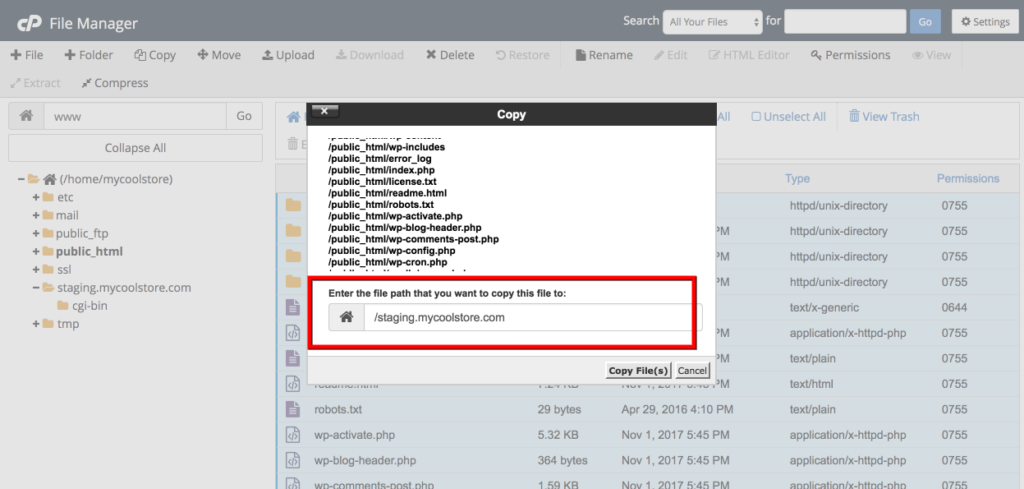
You’ll be prompted to enter where everything should be copied to – enter the path to the staging subdomain you created. In our example this is /home/mycoolstore/staging.mycoolstore.com – but yours might be different – again if you’re unsure ask your hosting company.
Next, go ahead and setup a new database for your staging store. Go to cPanel -> MySQL Database Wizard.
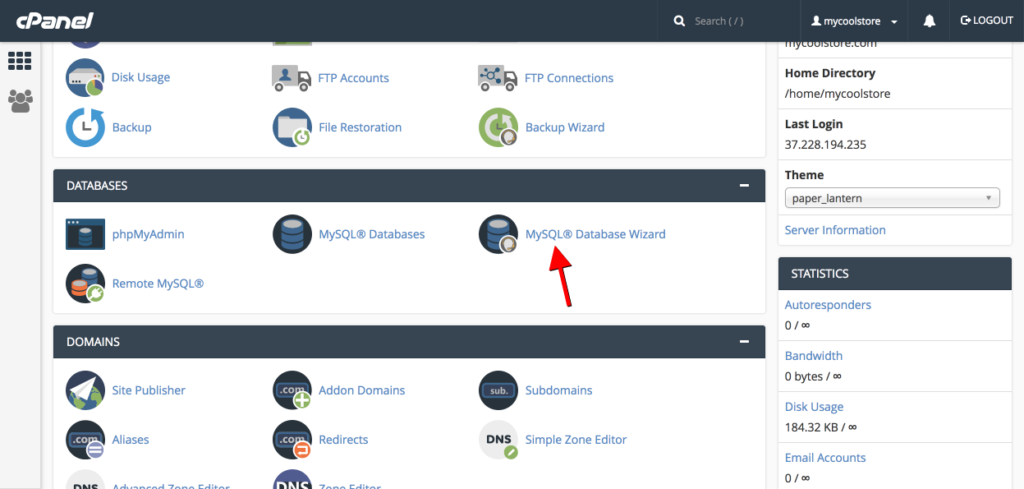
Enter a name for your staging database.
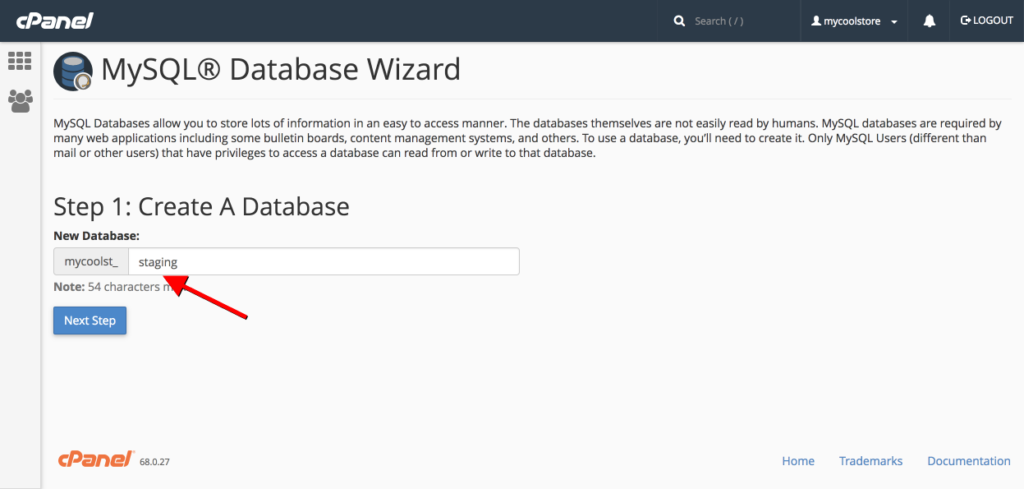
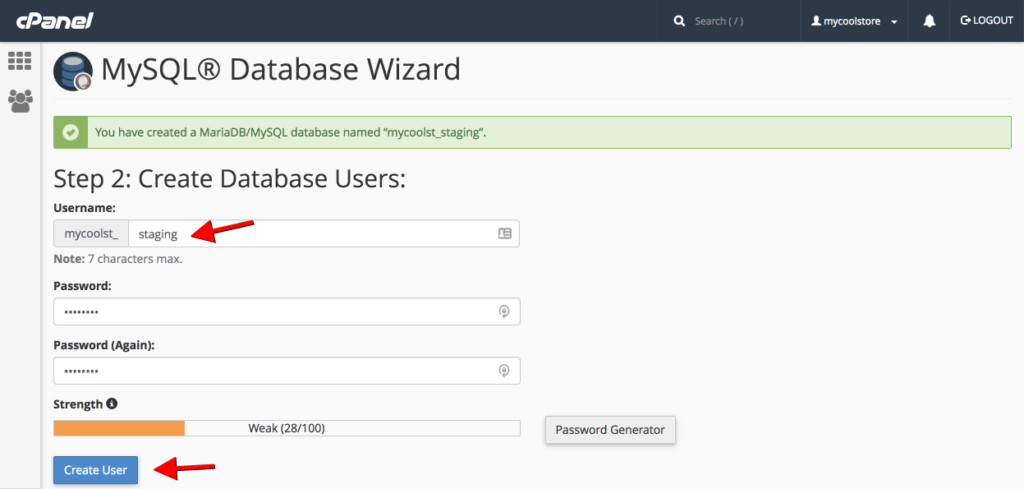
Go ahead and also create a user/password for this database and assign full permissions to complete the database wizard.
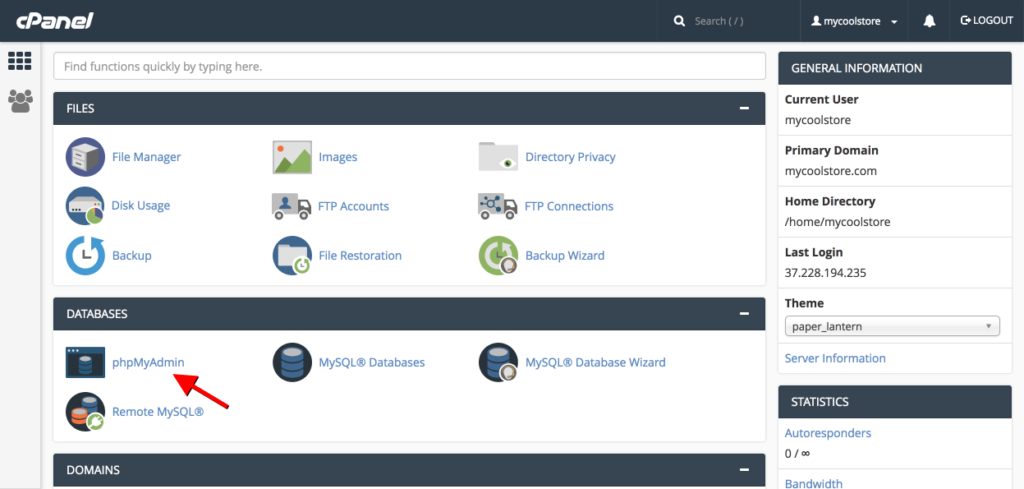
Next, go to cPanel -> phpMyAdmin
Find your live WordPress database, select all tables and choose Copy table from the action dropdown.
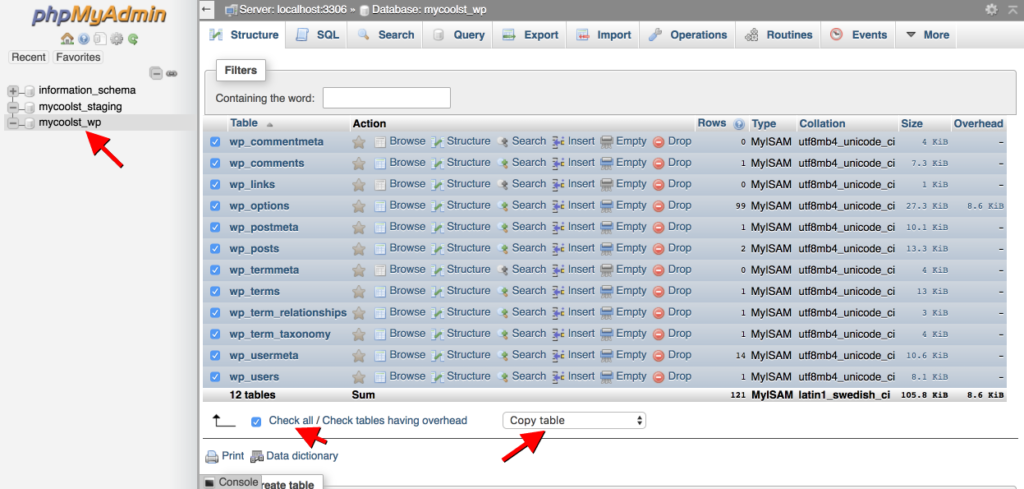
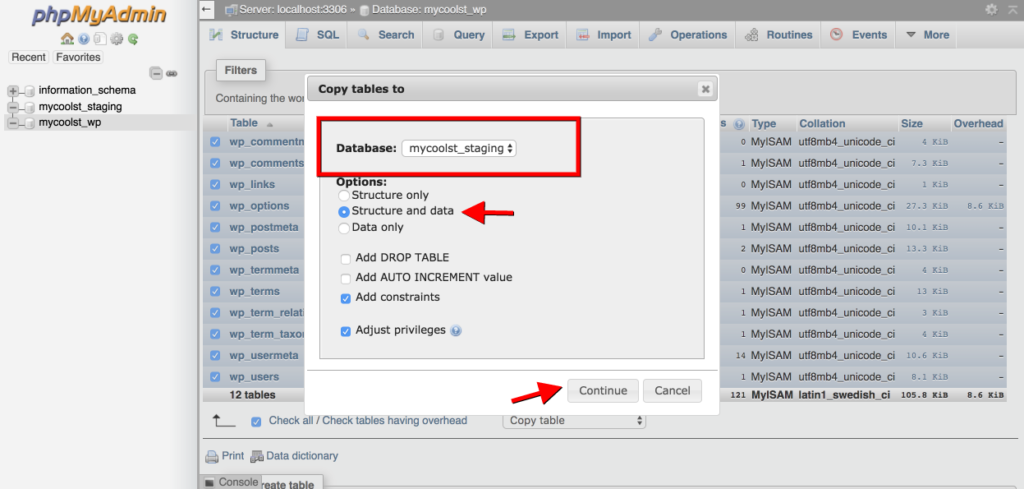
Once you do you’ll be asked where you want to copy your tables to. Select your staging database.
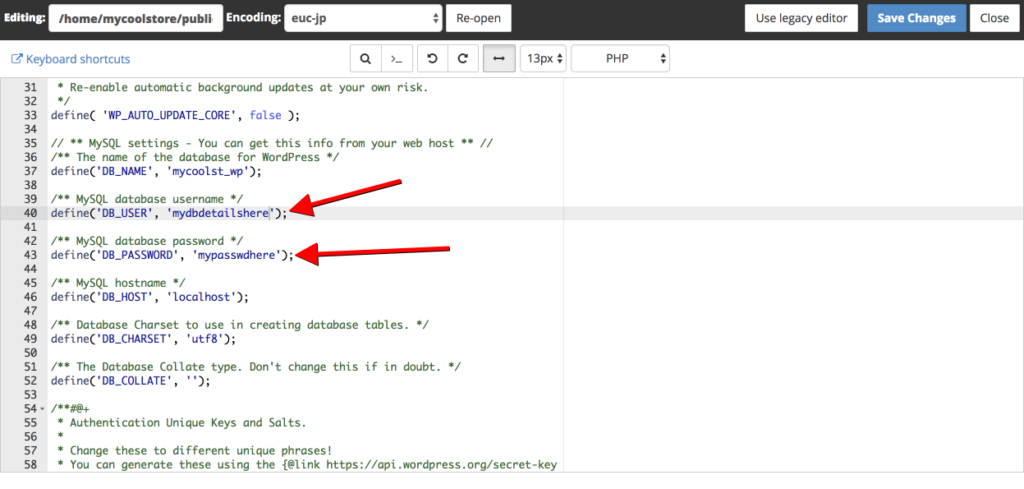
Next, open wp-config.php in your staging site and change your database details.
Nearly there now!
The final step you need to take is to Search and Replace your Site url in your database from www.mycoolstore.com to staging.mycoolstore.com. Again there are lots of ways to do this. One way you shouldn’t do this is to simply search/replace a dump of your database in a .sql file. Many records in the WordPress database rely on serialized values. When you simply search/replace a domain in a .sql file you’ll end up losing some important WP site settings particularly if your staging subdomain is a different length that your live domain.
If your host supports WP-CLI it’s very easy to do this with the search-replace command. In our example we would run the following:
| 1 | wp search-replace ‘https://www.mycoolstore.com’ ‘https://staging.mycoolstore.com’ |
If you don’t have access to WP-CLI then I recommend the following method.
Head back over to phpMyAdmin and select the wp_options table. We’re going to edit 2 records. Your siteurl and home records.
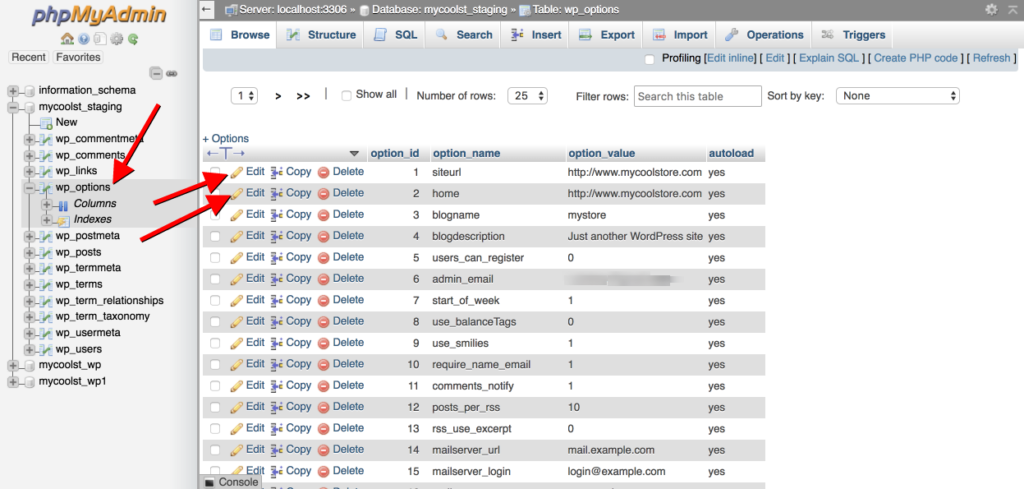
Go ahead and change both from www.mycoolstore.com to staging.mycoolstore.com
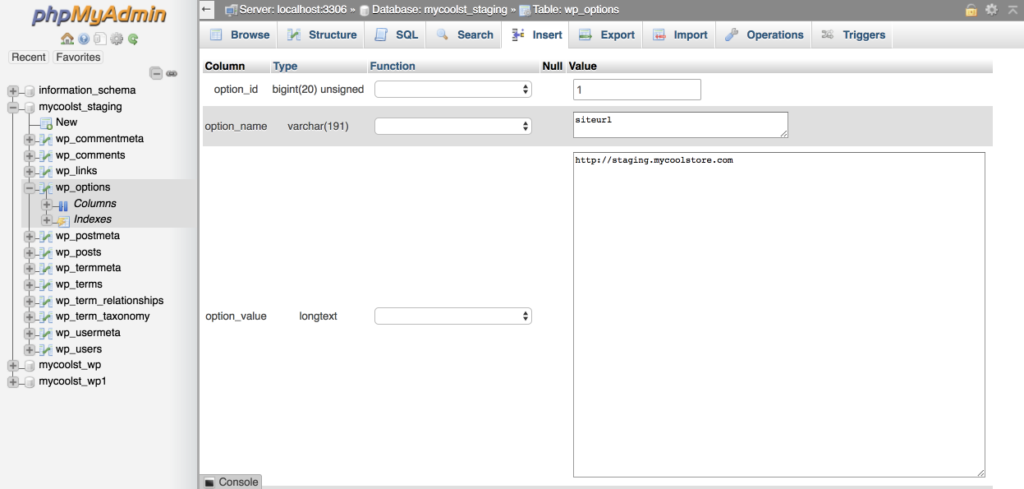
NOTE: Pay attention to your full url. If you’re not using SSL (and you really should be!) then make sure you keep http rather than adding https – and vice versa.
If you are using SSL, you will need to create a new certificate for your subdomain (assuming you’re not already using a wildcard SSL). Ask your host about the best way to do this if you’re unsure. For me, I use Let’s Encrypt to do this in a couple of seconds over on Siteground.
Finally, login to your new staging version at your WP login screen and install the Better Search Replace plugin. This plugin will allow you to easily and safely search-replace the rest of your staging WP database.
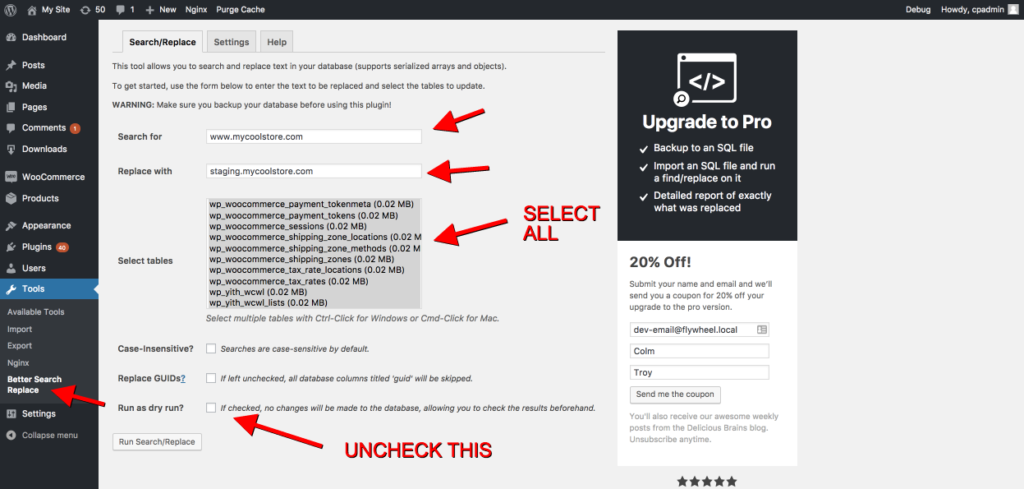
And that’s it! Your staging store is now a 100% isolated and fully functional clone of your live store. Some people like to switch payment gateways to test/sandbox mode on staging sites. I don’t recommend that. You should be able to process a live transaction from your staging site. Remember our staging site is most valuable to us when it’s as close as possible to our live site.
Method 3: Use a high quality WordPress host that provide support for staging websites
If Method 2 sounds like too much work to you, you might be better switching to a WordPress host who provides the ability to create staging websites on demand such as Siteground.
Other excellent hosts who provide full support for rapid creation of staging sites include:
What I like most about the Siteground staging site feature is that it includes a “Push to Live” feature which can be very very useful a little bit later on.
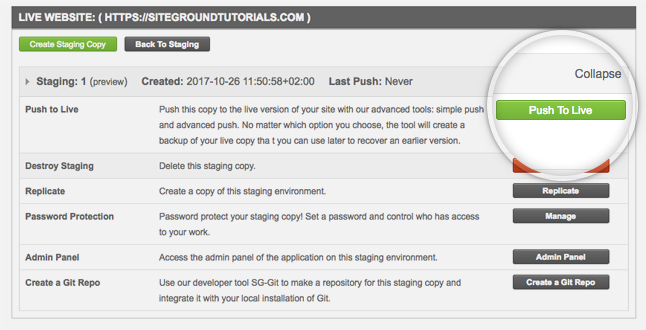
Finally, I recommend you password protect your new staging website using .htaccess to keep prying eyes out and to stop search engines from indexing your staging content.
Step 4 – Start following the WooCommerce development blog
The easiest way to avoid surprises with new WooCommerce updates is to actively follow the WooCommerce development blog. This is useful even if you’re not a designer or developer. Most of the blog posts are very straightforward to follow and usually provide a heads up well in advance of any significant new changes coming in future versions of WooCommerce.
Step 5 – Get ready for major WooCommerce releases
The WooCommerce team like to one or two significant releases over the source of a year. In recent years we’ve had big releases early in the year. Once you see that a big new release is imminent it’s worth getting in touch with the developers of any third party extensions and themes you use to find out how compatible your extensions and themes are with the new release. Most good WooCommerce developers will already know what’s coming and should be able to confirm a definitive timeframe for supporting new WC versions. If not, take this as a major red flag to stop using their code as soon as possible.
Step 6 – Update WooCommerce on Staging
Once the new WooCommerce version has been released (which, if you’re following the WooCommerce development blog you should get an email notification about), it’s time to head on over to staging to update WooCommerce.
NOW you can click the update plugin link 🙂
You should also now update any third party WooCommerce extensions and WooCommerce themes you rely on. You may find that there’s a gap between when the new WC version is released and when updates become available for your chosen extensions and themes. That’s ok – you’ll simply have to play the waiting game and leave your live store running the old version of WooCommerce for now. It can be frustrating to have to wait – but this is what is necessary if we’re to minimize disruption to our live store. Once you’ve got everything up to date it’s time to start testing.
Step 7 – Execute Tests
This is where all your hard work setting up a staging store pays off. Now you’ve got the latest and greatest version of WooCommerce up and running in an isolated, safe environment you can spend time testing everything without tearing your hair out in a panic.
Before running tests you should enable WP_DEBUG_LOG to ensure any underlying code errors are captured in your debug logs – which will be especially useful later when reporting bugs.
My recommendation is to document 2 sets of tests:
- Frontend customer tests
- Basic visual smoke tests – does everything load correctly and look the same as my live site?
- Can I browse the shop landing/categories page?
- Can I browse to individual category pages?
- Can I browse single product pages?
- Does the product search work?
- Functional tests
- Can I add and remove products from the cart?
- Can I complete a purchase?
- Do all transaction values match live?
- Product prices
- Shipping prices
- Do all transaction values match live?
- Does the cart and checkout experience match the live experience?
- Does My Account still work the same as live?
- Test order history, updating personal information, viewing order history.
- Basic visual smoke tests – does everything load correctly and look the same as my live site?
- Backend WooCommerce admin tests
- Orders
- Can I process orders as normal? Go through each different step in the order fulfilment process.
- Does Order/Customer search still work.
- Products
- Are stock values being adjusted correctly when orders are submitted?
- Can I still manage products as per live – what things have changed in the newest WC version and how do they impact my products?
- Orders
- WooCommerce Settings
- Are there any changes to settings that I need to be aware of before I go live?
Testing can be boring and tedious. But the more revenue your store generates, the more important this testing process becomes. Having well documented test cases will make it easier to do this on an ongoing basis. If you are a WooCommerce pro, you should take a look at WooCommerce End to End Testing to help you automate some of your test cases. For frontend tests it’s important to remember to execute tests via a clean browser session where you’ve none of your websites cookies present to accurately re-create the most common use cases of your customers.
Step 8 – Fix issues on Staging
It’s almost certain you will run into some issues on staging – I’m always suspicious when I find NO issues 🙂
When you find a bug or something that is not quite right you’ll need to figure out who is responsible for the bug. If you’re not a technical user there’s no easy way of figuring this out. What I typically recommend is following our troubleshooting steps to find the root cause of the issue.
Even with methodical troubleshooting it’s not always possible to find the culprit of a bug. When reporting bugs to a developer, it’s vital to provide as much data as possible on the issue:
- Exact steps along with screenshots, error messages and so on. Make sure you write bug reports that developers will love you for.
- Your WooCommerce System Status Report
- If appropriate, provide them with access to see the issue on your staging environment.
What happens after that point is going to be down to how responsive the relevant developers are, which is why it’s important to only use WooCommerce themes and extensions from developers who have a solid reputation for providing long term support for WooCommerce.
At this point you’ll likely need to rinse and repeat testing and updating in your staging environment.
Eventually you should reach a place where you’re happy with your staging environment so it’s time to deploy to live.
Step 9 – Deploy from staging to live
If you run a busy eCommerce store your database is constantly changing – which makes pushing changes from staging to live more complex than it otherwise might be on website with content that doesn’t change that often.
So you’ve got a few options to consider about how to deploy your now well tested staging store to live.
Option 1 – Manual deployment
This is often the simplest method of deployment. Simply repeat the steps you took on staging 🙂 For smaller WC updates where it’s just one minor WC update or a minor extension update – a quick manual update and test cycle on staging followed by a manual update and test cycle on live will work just as well as any other method.
Option 2 – Push from Staging to Live
For more complex staging instances it might not be feasible to manually update everything manually. In this scenario, you should consider setting up a process for pushing changes from staging to live. When we talk about pushing changes to staging to live we mean setting up a technical process to ‘push’ any code changes over from your staging site to production. The challenge with WordPress and WooCommerce is that under no circumstances do we want to LOSE any production data as a result of pushing from staging.
This is one of the weakest aspects of WordPress and WooCommerce right now that larger eCommerce platforms have long ago figured out.
If we could wave a magic wand we’d have a button in our staging site that would automatically push all code and database changes over to our live site but not move any transactional data from staging. This gets particularly tricky when WooCommerce introduces database changes as right now these need to be triggered manually once you login to WooCommerce after installing a plugin update.
There are a few plugins and services that are starting to emerge to help solve this problem.
Mergebot looks like the most promising service thus far. It’s specifically designed to solve this massive problem. Together with their sister product, WP Migrate DB Pro you’ll have everything you need to have a best in class code/data push process for your WooCommerce store. It’s still far from perfect and I’d love to see WooCommerce tackle this in core sooner rather than later.
Option 3 – Partial push using Version control
An excellent way of managing pushes from your staging to live is to manage your WooCommerce store via something like Git. We use Git along with Bitbucket and Jenkins to manage large WooCommerce deployments in a central git repo. Changes are pushed from local development environments to a central staging area. Once deployments are completed we executed automated end to end tests using Jenkins. If those tests all pass we then auto deploy to live by tagging and pushing branches to live. In this scenario we don’t use version control on our database so we’ll still need to login to live post deployment and run any WC data update processes that are required.
Wrapping things up
Managing changes with WooCommerce is definitely one of the weakest parts of WooCommerce as a platform right now. Quite simply, if you choose an alternative platform like Shopify you’ll never have to worry about many of the things we’ve detailed in this guide. In fact, if this guide sounds like complete overkill to you – trust me – it’s not.
If your WooCommerce store ever gets to the scale where you’re doing millions of dollars in revenue per year, you’re going to use this guide as a playbook for how you manage your WooCommerce updates. If that doesn’t sound like fun you’re either going to need to hire someone to do this for you – or else start looking for an alternative eCommerce platform!
I fully expect the WooCommerce ecosystem to continue to work on new and innovative ways to make it easier for us all to create staging versions of our online stores and – critically – to make the deployment to live process much, much easier.
Leave a Reply