Creating a Virtual Host for your Website
When using the Apache web server, you can create virtual hosts (similar to server blocks in Nginx) to encapsulate configuration details and host more than one domain from a single server. In this guide, we’ll set up a domain called your_domain, but you should replace this with your own domain name.
Note: In case you are using DigitalOcean as DNS hosting provider, check out our product documentation for detailed instructions on how to set up a new domain name and point it to your server.
Apache on Ubuntu 22.04 has one virtual host enabled by default that is configured to serve documents from the /var/www/html directory. While this works well for a single site, it can become unwieldy if you are hosting multiple sites. Instead of modifying /var/www/html, we’ll create a directory structure within /var/www for the your_domain site, leaving /var/www/html in place as the default directory to be served if a client request doesn’t match any other sites.
Create the directory for your_domain as follows:
sudo mkdir /var/www/your_domain
Next, assign ownership of the directory with the $USER environment variable, which will reference your current system user:
sudo chown -R $USER:$USER /var/www/your_domain
Then, open a new configuration file in Apache’s sites-available directory using your preferred command-line editor. Here, we’ll use nano:
sudo nano /etc/apache2/sites-available/your_domain.conf
This will create a new blank file. Add in the following bare-bones configuration with your own domain name:
/etc/apache2/sites-available/your_domain.conf
<VirtualHost *:80>
    ServerName your_domain
    ServerAlias www.your_domain
    ServerAdmin webmaster@localhost
    DocumentRoot /var/www/your_domain
    ErrorLog ${APACHE_LOG_DIR}/error.log
    CustomLog ${APACHE_LOG_DIR}/access.log combined
</VirtualHost>
Save and close the file when you’re done. If you’re using nano, do that by pressing CTRL+X, then Yand ENTER.
With this VirtualHost configuration, we’re telling Apache to serve your_domain using /var/www/your_domain as the web root directory. If you’d like to test Apache without a domain name, you can remove or comment out the options ServerName and ServerAlias by adding a pound sign (#) the beginning of each option’s lines.
Now, use a2ensite to enable the new virtual host:
sudo a2ensite your_domain
You might want to disable the default website that comes installed with Apache. This is required if you’re not using a custom domain name, because in this case Apache’s default configuration would override your virtual host. To disable Apache’s default website, type:
sudo a2dissite 000-default
To make sure your configuration file doesn’t contain syntax errors, run the following command:
sudo apache2ctl configtest
Finally, reload Apache so these changes take effect:
sudo systemctl reload apache2
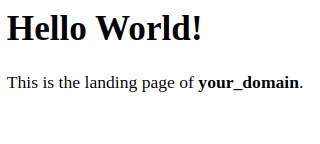
Your new website is now active, but the web root /var/www/your_domain is still empty. Create an index.html file in that location to test that the virtual host works as expected:
nano /var/www/your_domain/index.html
Include the following content in this file:
/var/www/your_domain/index.html
<html>
  <head>
    <title>your_domain website</title>
  </head>
  <body>
    <h1>Hello World!</h1>

    <p>This is the landing page of <strong>your_domain</strong>.</p>
  </body>
</html>
Save and close the file, then go to your browser and access your server’s domain name or IP address:
http://server_domain_or_IP
Your web page should reflect the contents in the file you just edited:
You can leave this file in place as a temporary landing page for your application until you set up an index.php file to replace it. Once you do that, remember to remove or rename the index.html file from your document root, as it would take precedence over an index.php file by default.
Obtaining an SSL Certificate
Certbot provides a variety of ways to obtain SSL certificates through plugins. The Apache plugin will take care of reconfiguring Apache and reloading the configuration whenever necessary. To use this plugin, run the following:
sudo certbot --apache
This script will prompt you to answer a series of questions in order to configure your SSL certificate. First, it will ask you for a valid email address. This email will be used for renewal notifications and security notices:
OutputSaving debug log to /var/log/letsencrypt/letsencrypt.log
Enter email address (used for urgent renewal and security notices)
 (Enter 'c' to cancel): you@your_domain
After providing a valid email address, press ENTER to proceed to the next step. You will then be prompted to confirm if you agree to Let’s Encrypt terms of service. You can confirm by pressing Yand then ENTER:
- - - - - - - - - - - - - - - - - - - - - - - - - - - - - - - - - - - - - - - -
Please read the Terms of Service at
https://letsencrypt.org/documents/LE-SA-v1.2-November-15-2017.pdf. You must
agree in order to register with the ACME server at
https://acme-v02.api.letsencrypt.org/directory
- - - - - - - - - - - - - - - - - - - - - - - - - - - - - - - - - - - - - - - -
(Y)es/(N)o: Y
Next, you’ll be asked if you would like to share your email with the Electronic Frontier Foundation to receive news and other information. If you do not want to subscribe to their content, write N. Otherwise, write Y then press ENTER to proceed to the next step:
- - - - - - - - - - - - - - - - - - - - - - - - - - - - - - - - - - - - - - - -
Would you be willing to share your email address with the Electronic Frontier
Foundation, a founding partner of the Let's Encrypt project and the non-profit
organization that develops Certbot? We'd like to send you email about our work
encrypting the web, EFF news, campaigns, and ways to support digital freedom.
- - - - - - - - - - - - - - - - - - - - - - - - - - - - - - - - - - - - - - - -
(Y)es/(N)o: N
The next step will prompt you to inform Certbot of which domains you’d like to activate HTTPS for. The listed domain names are automatically obtained from your Apache virtual host configuration, so it’s important to make sure you have the correct ServerName and ServerAlias settings configured in your virtual host. If you’d like to enable HTTPS for all listed domain names (recommended), you can leave the prompt blank and press ENTER to proceed. Otherwise, select the domains you want to enable HTTPS for by listing each appropriate number, separated by commas and/ or spaces, then press ENTER:
Which names would you like to activate HTTPS for?
- - - - - - - - - - - - - - - - - - - - - - - - - - - - - - - - - - - - - - - -
1: your_domain
2: www.your_domain
- - - - - - - - - - - - - - - - - - - - - - - - - - - - - - - - - - - - - - - -
Select the appropriate numbers separated by commas and/or spaces, or leave input
blank to select all options shown (Enter 'c' to cancel):
After this step, Certbot’s configuration is finished, and you will be presented with the final remarks about your new certificate and where to locate the generated files:
OutputSuccessfully received certificate.
Certificate is saved at: /etc/letsencrypt/live/your_domain/fullchain.pem
Key is saved at:         /etc/letsencrypt/live/your_domain/privkey.pem
This certificate expires on 2022-07-10.
These files will be updated when the certificate renews.
Certbot has set up a scheduled task to automatically renew this certificate in the background.

Deploying certificate
Successfully deployed certificate for your_domain to /etc/apache2/sites-available/your_domain-le-ssl.conf
Successfully deployed certificate for www.your_domain.com to /etc/apache2/sites-available/your_domain-le-ssl.conf
Congratulations! You have successfully enabled HTTPS on https:/your_domain and https://www.your_domain.com

- - - - - - - - - - - - - - - - - - - - - - - - - - - - - - - - - - - - - - - -
If you like Certbot, please consider supporting our work by:
 * Donating to ISRG / Let's Encrypt:   https://letsencrypt.org/donate
 * Donating to EFF:                    https://eff.org/donate-le
- - - - - - - - - - - - - - - - - - - - - - - - - - - - - - - - - - - - - - - -
Your certificate is now installed and loaded into Apache’s configuration. Try reloading your website using https:// and notice your browser’s security indicator. It should indicate that your site is properly secured, typically by a lock icon in the address bar.
You can use the SSL Labs Server Test to verify your certificate’s grade and obtain detailed information about it, from the perspective of an external service.
In the next and final step, you’ll test the auto-renewal feature of Certbot, which guarantees that your certificate will be renewed automatically before the expiration date.
Creating a MySQL Database and User for WordPress
The first step is a preparatory one. WordPress uses MySQL to manage and store site and user information. You have MySQL installed already, but need to make a database and a user for WordPress to use.
To get started, log into the MySQL root (administrative) account by issuing the following command (note that this is not the root user of your server):
sudo mysqlWithin the database, create a dedicated database for WordPress to control. You can call this whatever you would like, but we will be using the name wordpress in this guide. Create the database for WordPress by running the following command:
CREATE DATABASE wordpress DEFAULT CHARACTER SET utf8 COLLATE utf8_unicode_ci;
Note: Every MySQL statement must end in a semi-colon (;). Check to make sure this is present if you are running into any issues.
Next, you’re going to create a separate MySQL user account that you’ll use exclusively to operate your new database. Creating specific databases and accounts can support you from a management and security standpoint. We will use the name wordpressuser in this guide, but feel free to use any name you prefer for this use.
You can create this user by running the following command. Remember to choose a strong password here for your database user where we have password:
CREATE USER 'wordpressuser'@'%' IDENTIFIED WITH mysql_native_password BY 'password';
Next, let the database know that your wordpressuser should have complete access to the database you set up:
GRANT ALL ON wordpress.* TO 'wordpressuser'@'%';
You now have a database and user account, each made specifically for WordPress. You need to flush the privileges so that the current instance of MySQL knows about the recent changes made:
FLUSH PRIVILEGES;
Exit out of MySQL by writing the following:
EXIT;
In the next step, you’ll lay some foundations for WordPress plugins by downloading PHP extensions for your server.
Adjusting Apache’s Configuration to Allow for .htaccess Overrides and Rewrites
Next, you’ll be making a few minor adjustments to your Apache configuration. Based on the prerequisite tutorials, you should have a configuration file for your site in the /etc/apache2/sites-available/ directory.
In this guide, we’ll use /etc/apache2/sites-available/wordpress.conf as an example, but you should substitute the path to your existing configuration file where appropriate. Additionally, we will use /var/www/wordpress as the root directory of our WordPress installation. You should use the web root specified in your own configuration. If you followed our LAMP tutorial, it may be your domain name instead of wordpress in both of these instances.
Note: It’s possible you are using the 000-default.conf default configuration (with /var/www/htmlas your web root). This is fine to use if you’re only going to host one website on this server. If not, it’s better to split the necessary configuration into logical chunks, one file per site.
With your paths identified, you can move on to working with .htaccess so that Apache can handle configuration changes on a per-directory basis.
Enabling .htaccess Overrides
Currently, the use of .htaccess files is disabled. WordPress and many WordPress plugins use these files extensively for in-directory tweaks to the web server’s behavior.
Open the Apache configuration file for your website with your preferred text editor. Here, we’ll use nano:
sudo nano /etc/apache2/sites-available/wordpress.conf
To allow .htaccess files, you need to set the AllowOverride directive within a Directory block pointing to your document root. Add the following content inside the VirtualHost block in your configuration file, making sure to use the correct web root directory:
/etc/apache2/sites-available/wordpress.conf
<VirtualHost *:80>
. . .
    <Directory /var/www/wordpress/>
        AllowOverride All
    </Directory>
. . .
</VirtualHost>
When you are finished, save and close the file. In nano, you can do this by pressing CTRL and Xtogether, then Y, and ENTER.
Enabling the Changes
Before implementing the changes you’ve made, check to make sure you haven’t made any syntax errors by running the following test:
sudo apache2ctl configtest
You may receive output like the following:
OutputAH00558: apache2: Could not reliably determine the server's fully qualified domain name, using 127.0.1.1. Set the 'ServerName' directive globally to suppress this message
Syntax OK
If you wish to suppress the top line, add a ServerName directive to your main (global) Apache configuration file at /etc/apache2/apache2.conf. The ServerName can be your server’s domain or IP address. This is just a warning message, however, and doesn’t affect the functionality of your site. As long as the output contains Syntax OK, you are ready to continue.
Restart Apache to implement the changes. Make sure to restart now even if you have restarted earlier in this tutorial:
sudo systemctl restart apache2
Next, you’ll download and set up WordPress itself.
Downloading WordPress
Now that your server software is configured, you can download and set up WordPress. For security reasons, it is always recommended to get the latest version of WordPress from their site.
First, change into a writable directory (we recommend a temporary one like /tmp):
cd /tmp
Then download the compressed release with the following curl command:
curl -O https://wordpress.org/latest.tar.gz
Extract the compressed file to create the WordPress directory structure:
tar xzvf latest.tar.gz
You’ll be moving these files into your document root momentarily. Before doing so, you can add a dummy .htaccess file so that this will be available for WordPress to use later.
Create the file by running the following:
touch /tmp/wordpress/.htaccess
You’ll also copy over the sample configuration file to the filename that WordPress reads:
cp /tmp/wordpress/wp-config-sample.php /tmp/wordpress/wp-config.php
Additionally, create the upgrade directory so that WordPress won’t run into permissions issues when trying to do this on its own following an update to its software:
mkdir /tmp/wordpress/wp-content/upgrade
Now you can copy the entire contents of the directory into your document root. We are using a dot at the end of our source directory to indicate that everything within the directory should be copied, including hidden files (like the .htaccess file we created). Ensure that you replace the /var/www/wordpress directory with the directory you have set up on your server:
sudo cp -a /tmp/wordpress/. /var/www/wordpress
You’re now ready to configure your WordPress directory.
Configuring the WordPress Directory
Before starting the web-based WordPress setup, you need to adjust some items in your WordPress directory.
Adjusting the Ownership and Permissions
Another important step is setting up reasonable file permissions and ownership for the files and directories WordPress uses to function.
Start by giving ownership of all the files to the www-data user and group. This is the user that the Apache web server runs as, and Apache will need to be able to read and write WordPress files in order to serve the website and perform automatic updates.
Update the ownership with the chown command which allows you to modify file ownership. Be sure to point to your server’s relevant directory:
sudo chown -R www-data:www-data /var/www/wordpress
Next, run two find commands to set the correct permissions on the WordPress directories and files. This first find command sets every directory within the /var/www/<>^wordpress<^> directory and sets each one’s permissions to 750:
sudo find /var/www/wordpress/ -type d -exec chmod 750 {} \;
This one finds each file within the directory and sets their permissions to 640:
sudo find /var/www/wordpress/ -type f -exec chmod 640 {} \;
These permissions should get you working effectively with WordPress, but note that some plugins and procedures may require additional tweaks.
Setting Up the WordPress Configuration File
Now, you need to make some changes to the main WordPress configuration file.
When you open the file, your first task will be to adjust some secret keys to provide a level of security for your installation. WordPress provides a secure generator for these values so that you do not have to try to come up with good values on your own. These are only used internally, so it won’t hurt usability to have complex, secure values here.
To grab secure values from the WordPress secret key generator, run the following:
curl -s https://api.wordpress.org/secret-key/1.1/salt/
You will receive unique values that resemble output similar to the following:
Warning! It is important that you request unique values each time. Do NOT copy the following example values!
Outputdefine('AUTH_KEY',         '1jl/vqfs<XhdXoAPz9 DO NOT COPY THESE VALUES c_j{iwqD^<+c9.k<J@4H');
define('SECURE_AUTH_KEY',  'E2N-h2]Dcvp+aS/p7X DO NOT COPY THESE VALUES {Ka(f;rv?Pxf})CgLi-3');
define('LOGGED_IN_KEY',    'W(50,{W^,OPB%PB<JF DO NOT COPY THESE VALUES 2;y&,2m%3]R6DUth[;88');
define('NONCE_KEY',        'll,4UC)7ua+8<!4VM+ DO NOT COPY THESE VALUES #`DXF+[$atzM7 o^-C7g');
define('AUTH_SALT',        'koMrurzOA+|L_lG}kf DO NOT COPY THESE VALUES  07VC*Lj*lD&?3w!BT#-');
define('SECURE_AUTH_SALT', 'p32*p,]z%LZ+pAu:VY DO NOT COPY THESE VALUES C-?y+K0DK_+F|0h{!_xY');
define('LOGGED_IN_SALT',   'i^/G2W7!-1H2OQ+t$3 DO NOT COPY THESE VALUES t6**bRVFSD[Hi])-qS`|');
define('NONCE_SALT',       'Q6]U:K?j4L%Z]}h^q7 DO NOT COPY THESE VALUES 1% ^qUswWgn+6&xqHN&%');
These are configuration lines that you can place directly into your configuration file to set secure keys. Copy the output you received now.
Next, open the WordPress configuration file:
sudo nano /var/www/wordpress/wp-config.php
Find the section that contains the example values for those settings:
/var/www/wordpress/wp-config.php
. . .

define('AUTH_KEY',         'put your unique phrase here');
define('SECURE_AUTH_KEY',  'put your unique phrase here');
define('LOGGED_IN_KEY',    'put your unique phrase here');
define('NONCE_KEY',        'put your unique phrase here');
define('AUTH_SALT',        'put your unique phrase here');
define('SECURE_AUTH_SALT', 'put your unique phrase here');
define('LOGGED_IN_SALT',   'put your unique phrase here');
define('NONCE_SALT',       'put your unique phrase here');

. . .
Delete those lines and insert the values you copied from the command line:
/var/www/wordpress/wp-config.php
. . .

define('AUTH_KEY',         'VALUES COPIED FROM THE COMMAND LINE');
define('SECURE_AUTH_KEY',  'VALUES COPIED FROM THE COMMAND LINE');
define('LOGGED_IN_KEY',    'VALUES COPIED FROM THE COMMAND LINE');
define('NONCE_KEY',        'VALUES COPIED FROM THE COMMAND LINE');
define('AUTH_SALT',        'VALUES COPIED FROM THE COMMAND LINE');
define('SECURE_AUTH_SALT', 'VALUES COPIED FROM THE COMMAND LINE');
define('LOGGED_IN_SALT',   'VALUES COPIED FROM THE COMMAND LINE');
define('NONCE_SALT',       'VALUES COPIED FROM THE COMMAND LINE');

. . .
Next, you’re going to modify some of the database connection settings at the beginning of the file. You need to adjust the database name, the database user, and the associated password that you configured within MySQL.
The other change you need to make is to set the method that WordPress should use to write to the filesystem. Since you’ve given the web server permission to write where it needs to, you can explicitly set the filesystem method to “direct”. Failure to set this with your current settings would result in WordPress prompting for FTP credentials when performing some actions.
This setting can be added below the database connection settings, or anywhere else in the file:
/var/www/wordpress/wp-config.php
. . .

// ** MySQL settings - You can get this info from your web host ** //
/** The name of the database for WordPress */
define( 'DB_NAME', 'wordpress' );

/** MySQL database username */
define( 'DB_USER', 'wordpressuser' );

/** MySQL database password */
define( 'DB_PASSWORD', 'password' );

/** MySQL hostname */
define( 'DB_HOST', 'localhost' );

/** Database Charset to use in creating database tables. */
define( 'DB_CHARSET', 'utf8' );

/** The Database Collate type. Don't change this if in doubt. */
define( 'DB_COLLATE', '' );


. . .

define('FS_METHOD', 'direct');
Save and close the file when you are finished.
Completing the Installation Through the Web Interface
Now that the server configuration is complete, you can complete the installation through the web interface.
In your web browser, navigate to your server’s domain name or public IP address:
https://server_domain_or_IP
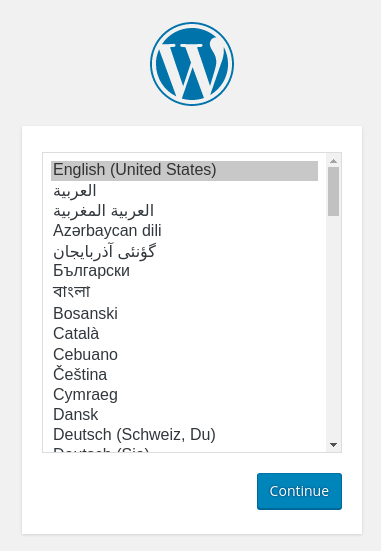
You will be prompted to select the language you would like to use:
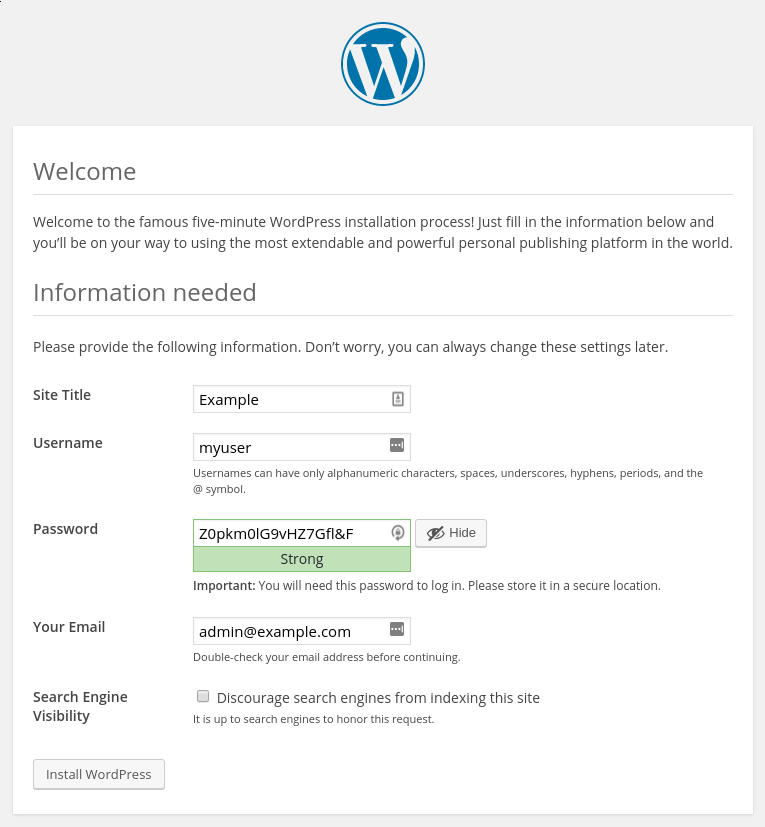
Next, you will come to the main setup page.
Select a name for your WordPress site and choose a username. It is recommended to choose something unique and avoid common usernames like “admin” for security purposes. A strong password is generated automatically. Save this password or select an alternative strong password.
Enter your email address and select whether you want to discourage search engines from indexing your site:
When you click ahead, you will be taken to a page that prompts you to log in:

Once you log in, you will be taken to the WordPress administration dashboard:


At this point, you can begin to design your WordPress website. If this is your first time using WordPress, explore the interface to get acquainted with your new CMS.
Leave a Reply